Set up a Cardano Stake Pool on testnet
This document is intended for those within the Midnight community looking to set up a Cardano Stake Pool on the testnet.
Overview
Cardano Stake Pool Operators are crucial for block production on Partner Chains like the Midnight Testnet, which is paired with Cardano's Preview Testnet. This document refers to these as Preview and Testnet, respectively.
Environment setup
This workshop is designed for execution on a single machine where virtual machines are managed using Multipass. However, in a production environment, you might opt for dedicated bare metal servers or cloud services.
Minimum system requirements
Following this exercise can be done on a local workstation or dedicated servers.
Local workstation
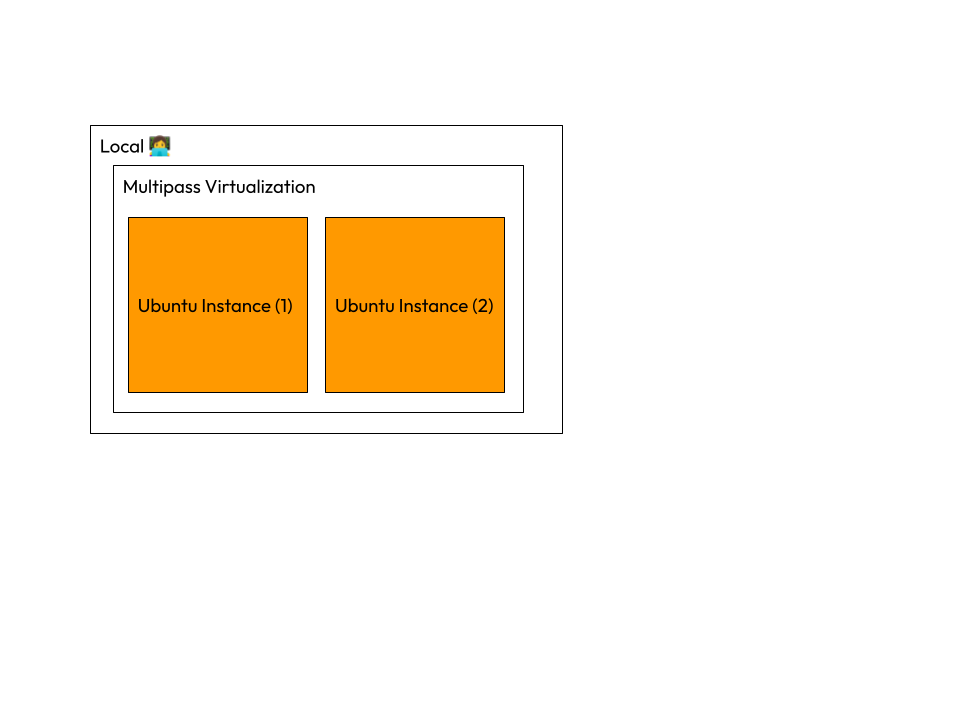
This will be divided amongst 2 local virtual machines.
| Component | Requirement |
|---|---|
| CPU | At least 4 cores |
| Storage | Minimum of 40 GB |
| Memory | At least 8 GB |
Provider
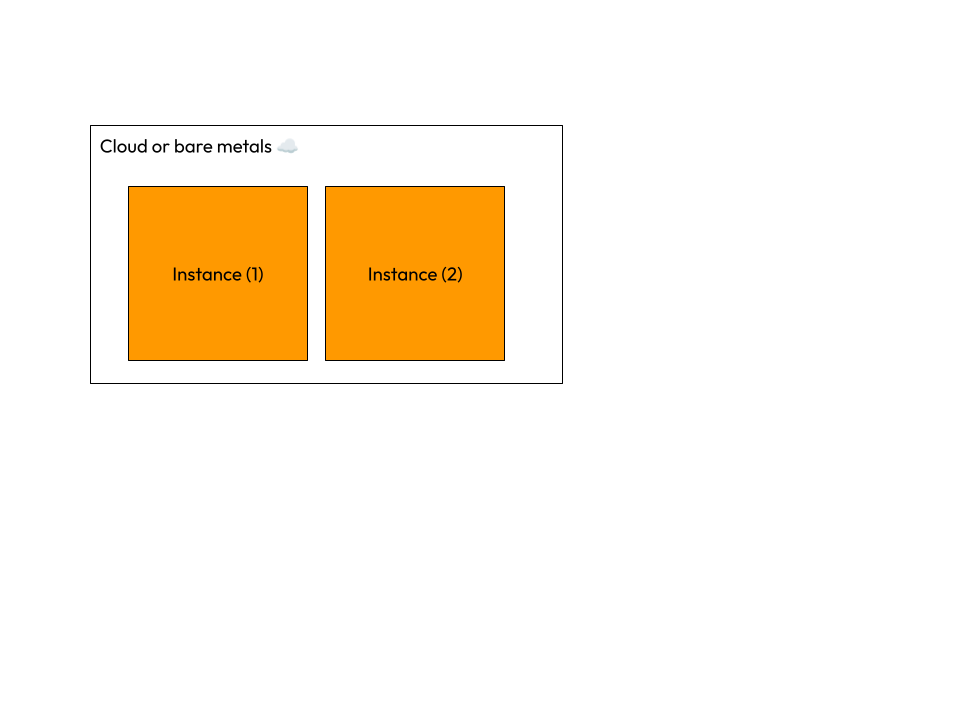
Instance 1/2
| Component | Requirement |
|---|---|
| CPU | At least 2 cores |
| Storage | Minimum of 40 GB |
| Memory | At least 6 GB |
Instance 2/2
| Component | Requirement |
|---|---|
| CPU | At least 2 cores |
| Storage | Minimum of 40 GB |
| Memory | At least 6 GB |
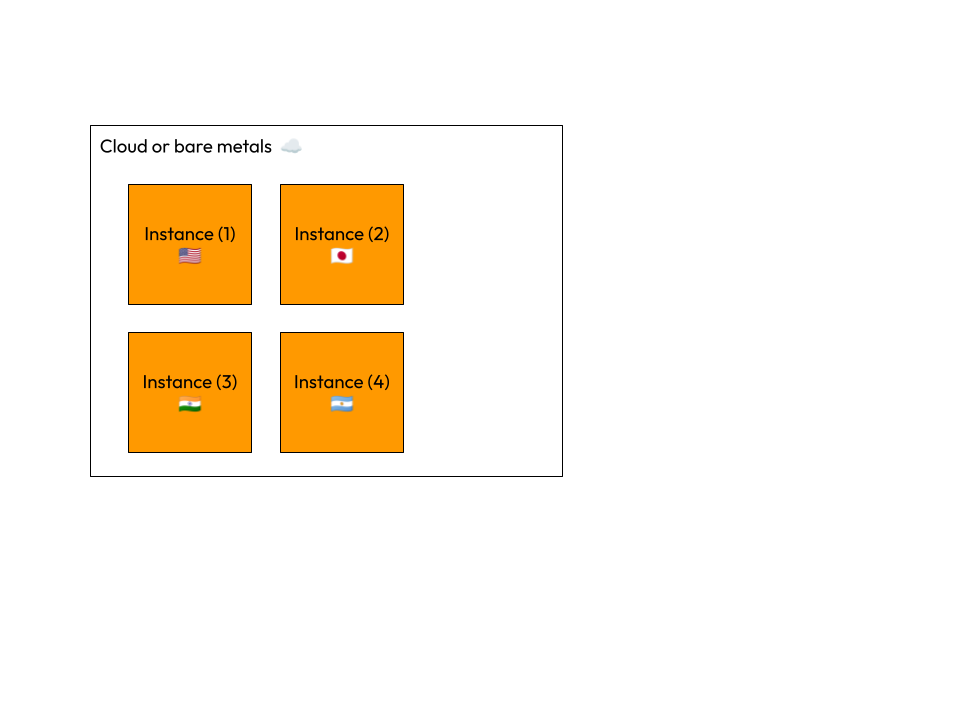
Optimal Production Setup
This tutorial focuses on a simplified setup and does not cover a full production Cardano Stake Pool Operator (SPO) configuration. In a production environment, an optimal Cardano SPO setup would typically include a dedicated instance for the block producer node and multiple relay nodes deployed across diverse geographical locations. This distributed architecture enhances network resilience, security, and performance by ensuring redundancy and minimizing latency.
- For official recommended system requirements for mainnet and production. Visit the Cardano docs: https://developers.cardano.org/docs/operate-a-stake-pool/hardware-requirements/.
Mac/ ARM compatibility:
- It is strongly recommended to use systems with AMD or Intel architecture due to better support from Cardano tools. There is limited pre-built binary support for ARM and M-Chip architectures:
- If you use ARM or M-Chip architectures, you might need to compile the software from source or use trusted releases.
- An optional workaround for ARM and M-Chip users is provided in this documentation.
Windows compatibility:
- Windows users need Bash-compatible tools like GitBash for script execution.
Prerequisites
- System Administration: Familiarity with managing system resources and configurations.
- Networking: Understanding of network topologies and configurations pertinent to blockchain node operations.
- Command-Line Interface (CLI): Proficiency in using command-line tools, as much of the setup will involve CLI interactions.
Step 01 - Creating virtual machines using Multipass
Introduction to Multipass
Multipass is utilized for launching Ubuntu virtual machines with ease. To install Multipass, one should visit the Multipass website and download the installer. For Linux users, installation can also be done via a snap package:
Installation on Linux:
Multipass uses KVM (Kernel-based Virtual Machine) as the default hypervisor for managing Ubuntu virtual machine instances. Therefore, it’s important to confirm KVM is enabled.
- Ensure KVM is enabled:
lsmod | grep kvm #check if KVM is enabled
- Output may return:
lsmod | grep kvm
kvm_intel             487424  0
kvm                  1404928  1 kvm_intel
irqbypass              12288  1 kvm
- Install Snap if not already present:
sudo apt install snapd
- Install Multipass:
sudo snap install multipass --classic
- Verify installation:
multipass --version # display current version
multipass --help # display usage and commands
which multipass # verify installation path
Launch virtual machines
- To create two virtual machines, use the following script:
#!/bin/bash

# Launch multipass instances
echo "✨ Creating cute little instances! ✨"
multipass launch -n cn1 -c 2 -m 4gb -d 40gb
multipass launch -n cn2 -c 2 -m 4gb -d 40gb
echo "🐾 Instances are born! 🐾"

instances=("cn1" "cn2")

# Function to check if architecture is ARM
is_arm_architecture() {
    if uname -m | grep -q "arm" || uname -m | grep -q "aarch64"; then
        return 0  # True (ARM detected)
    else
        return 1  # False (not ARM)
    fi
}

for instance in "${instances[@]}"; do
    echo "🚀 Running commands on $instance... 🌟"

    multipass exec "$instance" -- bash -c '
        # Always run the standard setup first
        echo "🐼 Running standard setup for all architectures... 🐼"
        sudo apt update -y && sudo apt upgrade -y
        mkdir -p "$HOME/tmp" && cd "$HOME/tmp"
        sudo apt -y install curl
        echo "🐸 Downloading guild-deploy script..."
        curl -sS -o guild-deploy.sh https://raw.githubusercontent.com/cardano-community/guild-operators/master/scripts/cnode-helper-scripts/guild-deploy.sh
        chmod 755 guild-deploy.sh
        ./guild-deploy.sh -b master -n preview -t cnode -s pdlcowx
        . "${HOME}/.bashrc"
        cd ~/git || mkdir -p ~/git && cd ~/git
        echo "🦋 Cloning cardano-node repository..."
        git clone https://github.com/intersectmbo/cardano-node || (cd cardano-node && git fetch --tags --recurse-submodules --all && git pull)
        cd cardano-node
        git checkout $(curl -sLf https://api.github.com/repos/intersectmbo/cardano-node/releases/latest | jq -r .tag_name)
        $CNODE_HOME/scripts/cabal-build-all.sh

        # Check architecture and run additional ARM-specific steps if needed
        if uname -m | grep -q "arm" || uname -m | grep -q "aarch64"; then
            # ARM-specific additional commands
            echo "🐙 Detected ARM architecture, running additional ARM-specific setup... 🐙"
            ARCHIVE_URL="https://github.com/armada-alliance/cardano-node-binaries/raw/refs/heads/main/static-binaries/cardano-10_1_4-aarch64-static-musl-ghc_966.tar.zst"
            ADDRESS_URL="https://github.com/armada-alliance/cardano-node-binaries/raw/refs/heads/main/miscellaneous/cardano-address.zip"
            DEST_DIR="$HOME/.local/bin"
            mkdir -p "$DEST_DIR"

            echo "🐳 Downloading cardano-node archive..."
            curl -L "$ARCHIVE_URL" -o cardano-10_1_4.tar.zst
            if [ $? -ne 0 ]; then
                echo "😿 Failed to download the cardano-node archive."
                exit 1
            fi

            echo "🦄 Downloading cardano-address archive..."
            curl -L "$ADDRESS_URL" -o cardano-address.zip
            if [ $? -ne 0 ]; then
                echo "😿 Failed to download the cardano-address archive."
                exit 1
            fi

            if ! command -v zstd &> /dev/null; then
                sudo apt-get update -y
                sudo apt-get install -y zstd unzip
            elif ! command -v unzip &> /dev/null; then
                sudo apt-get install -y unzip
            fi

            echo "🐰 Extracting cardano-node archive..."
            zstd -d -c cardano-10_1_4.tar.zst | tar -x -C "$DEST_DIR" --strip-components=1
            if [ $? -ne 0 ]; then
                echo "😿 Failed to extract the cardano-node archive."
                exit 1
            fi

            echo "🦊 Extracting cardano-address archive..."
            unzip -d "$DEST_DIR" cardano-address.zip
            if [ $? -ne 0 ]; then
                echo "😿 Failed to extract the cardano-address archive."
                exit 1
            fi

            rm cardano-10_1_4.tar.zst cardano-address.zip
            echo "🌈 Additional ARM archives downloaded and extracted successfully to $DEST_DIR"
        fi
    '

    echo "🎉 Finished running commands on $instance! 🐾✨"
done
This script sets up two VMs named cn1 and cn2 (representing "cardano-node-1" and "cardano-node-2") with 2 CPU cores, 4 GB of memory, and 20 GB of disk storage for each instance.
Listing instances
- List all running instances to verify setup:
multipass list
The output might look like:
Name                    State             IPv4             Image
cn1                     Running           x.x.x.x      Ubuntu 24.04 LTS
cn2                     Running           x.x.x.x    Ubuntu 24.04 LTS
Note the IP addresses for future reference. They will be needed when modifying node configuration files.
Graphical Interface
- Multipass also provides a GUI. Users can find and manage virtual machines by searching for "Multipass" in their application list.
Step 02 - Configure and start relay rode (cn1)
Access relay node instance
multipass shell cn1
Initial setup verification
- Upon installation, the SPO toolkit should have set up the
$CNODE_HOMEvariable to/opt/cardano/cnode, where Cardano node files are stored. - Verify setup:
- echo
$CNODE_HOMEshould return/opt/cardano/cnode. - which cardano-node should return
/home/ubuntu/.local/bin/cardano-node.
- echo
Environment variables
The SPO toolkit provides default paths and variables in $CNODE_HOME/scripts/env. Key variables include:
CNODEBIN: "/home/ubuntu/.local/bin/cardano-node"
CCLI: "/home/ubuntu/.local/bin/cardano-cli"
CNODE_PORT: 6000
POOL_NAME: "GUILD"
These can be customized (if desired) by overriding the environment variables, e.g., export CNODE_PORT=6001.
Test start the relay node
- Navigate to the scripts directory:
cd "${CNODE_HOME}"/scripts
- Start the node interactively in shell:
./cnode.sh
- Expected output should conclude with
Listening on http://127.0.0.1:12798. - Press Ctrl + C to stop the node.
Node monitoring
gLiveView displays realtime information on the Cardano node including, but not limited to synchronization status. The node is working correctly if it is syncing and propagating blocks.
- Start the node iteratively in shell again:
cd "${CNODE_HOME}"/scripts
./cnode.sh
- Open a new shell and use gLiveView for real-time monitoring:
cd $CNODE_HOME/scripts
./gLiveView.sh
- Example gLiveView output:
> Cardano Node - (Relay - Preview) : 10.1.3 [36871ba0] <
┌──────�─────────────────────────┬────────────┬─────────────────────────┐
│ Uptime: 02:18:07 │ Port: 6000 │ Koios gLiveView v1.30.4 │
│-------------------------------└────────────┴─────────────────────────┤
│ Epoch 807 [82.1%], 04:17:09 remaining │
│ ▌▌▌▌▌▌▌▌▌▌▌▌▌▌▌▌▌▌▌▌▌▌▌▌▌▌▌▌▌▌▌▌▌▌▌▌▌▌▌▌▌▌▌▌▌▌▌▌▌▌▌▌▌▌▌▖▖▖▖▖▖▖▖▖▖▖▖▖ │
│ │
│ Block : 2856308 Tip (ref) : 69795771 Forks : 4 │
│ Slot : 69795764 Tip (diff) : 7 :) Total Tx : 0 │
│ Slot epoch : 70964 Density : 4.014 Pending Tx : 0/0K │
│- CONNECTIONS --------------------------------------------------------│
│ P2P : enabled Cold Peers : 50 Uni-Dir : 0 │
│ Incoming : 0 Warm Peers : 30 Bi-Dir : 60 │
│ Outgoing : 60 Hot Peers : 20 Duplex : 0 │
│- BLOCK PROPAGATION --------------------------------------------------│
│ Last Block : 0.38s Less than 1|3|5s [%] : 99.10 | 100 | 100 │
│- NODE RESOURCE USAGE ------------------------------------------------│
│ CPU (sys) : 2.15% Mem (RSS) : 2.5G Disk util : 79% │
└──────────────────────────────────────────────────────────────────────┘
- Press Ctrl + C to stop gLiveView.
- Press Ctrl + C to stop the relay node.
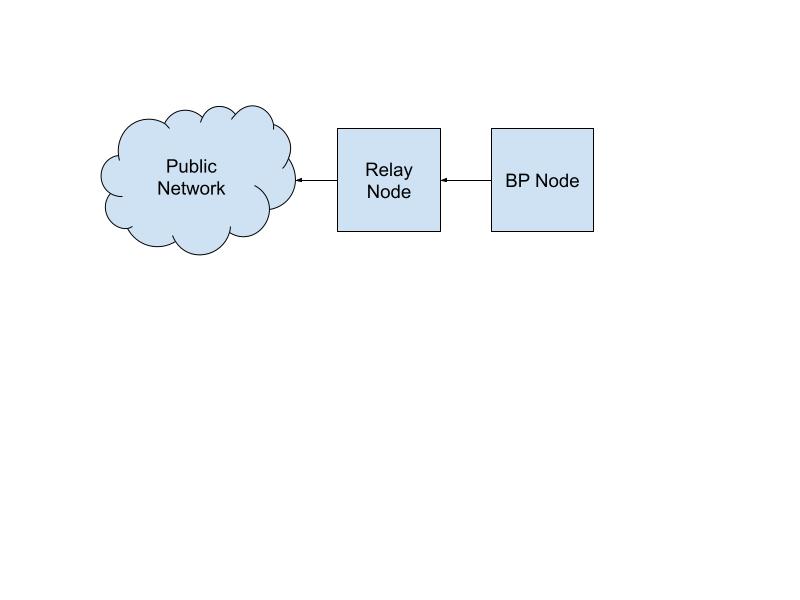
Connect relay node (cn1) to block producer node (cn2)
The relay node (cn1) will peer with the broader network. However, the block producer node (cn2) will only peer with the relay node (cn1). This can be done by modifying the cn1 configuration file and topology.
- Edit
config.jsonto enable peer sharing:
vim $CNODE_HOME/files/config.json
Change "PeerSharing" from false to true.
- Modify topology.json for persistent connection to intended block producer node:
- Open $CNODE_HOME/files/topology.json and update the "localRoots" to include an "accessPoints" to block producer node (cn2). Simply replace the placeholder, "replace-this-with-BP" with cn2's IP and port. Remove the relay line unless additional relay connections are needed.
- Set "hotValency" to 1 since we have only one block producer node.
For example, change:
"localRoots": [
    {
      "accessPoints": [
        {"address": "127.0.0.1", "port": 6000, "description": "replace-this-with-BP"},
        {"address": "127.0.0.1", "port": 6001, "description": "replace-this-with-relay"}
      ],
      "advertise": false,
      "trustable": true,
      "hotValency": 2
    },
To:
  "localRoots": [
    {
      "accessPoints": [
        {"address": "x.x.x.x", "port": 6000, "description": "cn2 BP node"}
      ],
      "advertise": false,
      "trustable": true,
      "hotValency": 1
    },
What the full topology.json may look like:
{
  "bootstrapPeers": [
    {
      "address": "preview-node.play.dev.cardano.org",
      "port": 3001
    }
  ],
  "localRoots": [
    {
      "accessPoints": [
        {"address": "x.x.x.x", "port": 6000, "description": "cn2 BP node"}
      ],
      "advertise": false,
      "trustable": true,
      "hotValency": 1
    },
    {
      "accessPoints": [
        {"address": "preview-test.ahlnet.nu", "port": 2102, "pool": "AHL"},
        {"address": "95.216.173.194", "port": 16000, "pool": "HOM1"},
        {"address": "tn-preview.psilobyte.io", "port": 4201, "pool": "PSBT"},
        {"address": "tn-preview2.psilobyte.io", "port": 4202, "pool": "PSBT"}
      ],
      "advertise": false,
      "trustable": false,
      "hotValency": 2,
      "warmValency": 3
    }
  ],
  "publicRoots": [
    {
      "accessPoints": [],
      "advertise": false
    }
  ],
  "useLedgerAfterSlot": 53827185
}
- Test start the node again ensuring node continues to function since file changes:
cd "${CNODE_HOME}"/scripts
./cnode.sh
# in another shell monitor node with gLiveView like so:
cd "${CNODE_HOME}"/scripts
./gLiveView.sh
- Press Ctrl + C to stop.
Configure relay node to run as a systemd service for automatic startup
To transition from manually starting the Cardano node to an automated process, the operator should configure it as a systemd service. This configuration allows for automatic startup and better system integration. Here's how to proceed:
- Navigate to the $CNODE_HOME/scripts directory:
cd $CNODE_HOME/scripts
- Run systemd setup script for node service:
./cnode.sh -d
# Deploying cnode.service as systemd service
# cnode.service deployed successfully
- Run systemd setup script for submit-api service:
./submitapi.sh -d
# Deploying cnode-submit-api.service as systemd service
# cnode-submit-api deployed successfully
- Start the systemd services:
sudo systemctl start cnode.service
sudo systemctl start cnode-submit-api.service
- Check service status and manage services:
sudo systemctl status cnode.service
sudo systemctl status cnode-submit-api.service
Replace status with stop, start, or restart as needed.
- Optionally, monitor node service with gLiveView.
cd $CNODE_HOME/scripts
./gLiveView.sh
At this point, cn1 and cn2 need to fully synchronize before continuing. This can take a couple hours.
Step 03 - Start cn2 as a relay node
Remember, cn1 is designated as a relay node, but cn2 is initially set up as a relay node but will later be converted into a block producer node.
Access BP node instance
multipass shell cn2
Configure relay rode to run as a systemd service for automatic startup
To transition from manually starting the Cardano node to an automated process, the operator should configure it as a systemd service. This configuration allows for automatic startup and better system integration. Here's how to proceed:
- Navigate to the
$CNODE_HOME/scriptsdirectory:
cd $CNODE_HOME/scripts
- Run systemd setup script for node service:
./cnode.sh -d
# Deploying cnode.service as systemd service
# cnode.service deployed successfully
- Run systemd setup script for submit-api service:
./submitapi.sh -d
# Deploying cnode-submit-api.service as systemd service
# cnode-submit-api deployed successfully
- Start the systemd services:
sudo systemctl start cnode.service
sudo systemctl start cnode-submit-api.service
- Check service status and manage services:
sudo systemctl status cnode.service
sudo systemctl status cnode-submit-api.service
Replace status with stop, start, or restart as needed.
- Optionally, monitor node service with gLiveView.
cd $CNODE_HOME/scripts
./gLiveView.sh
✅ At this point, cn1 and cn2 need to fully synchronize before continuing. This can take a couple hours.
Step 04 - Create and fund wallets with CNTools
This step involves keys. So, please read this step entirely before following.
A single wallet can serve for both the pool registration fee, and pool pledge. However, the recommendation is to establish a new wallet specifically for pool registration and transaction fees, while using a separate wallet for pledge.
- Enter cn2 instance:
multipass shell cn2
- Invoke CNTools in offline mode:
cd "${CNODE_HOME}"/scripts
./cntools.sh -o
Example output:
 What would you like to do?

  [w] Wallet
  [f] Funds
  [p] Pool
  [t] Transaction
  [v] Vote
  [z] Backup & Restore
  [r] Refresh
  [q] Quit
This will launch a wizard within the shell.
- Use ⬆️⬇️ arrow keys to navigate to Wallet and press [Enter] key, or simply press [w] on keyboard key.
 Select Wallet Operation

  [n] New
  [i] Import
  [r] Register
  [z] De-Register
  [l] List
  [s] Show
  [x] Remove
  [d] Decrypt
  [e] Encrypt
  [h] Home
- Select New to create a new wallet.
- If desired, Import an existing wallet.
Select Wallet Creation Type

  [m] Mnemonic
  [c] CLI
  [b] Back
  [h] Home
- Select Mnemonic.
Name of wallet (non-alphanumeric characters will be replaced with a space):
- Enter a name for the wallet (ex: mainwallet) and follow the prompts. Select default options.
- ⚠️ Write down the 24 word recovery phrase for the wallet and store it in a safe place.
Name of wallet (non-alphanumeric characters will be replaced with a space): mainwallet

Enter a custom account index to derive keys for (enter for default)
Account (default: 0):

Enter a custom key index to derive keys for (enter for default)
Key index (default: 0):

Wallet Imported : mainwallet
Address         : addr_test1qz...
Payment Address : addr_test1vz...

IMPORTANT! Please write down and store below words in a secure place to be able to restore wallet at a later time.
 1: ipsum      2: ipsum     3: ipsum   4: ipsum
 5: ipsum    6: ipsum     7: ipsum   8: ipsum
 9: ipsum    10: ipsum    11: ipsum   12: ipsum
13: ipsum     14: ipsum    15: ipsum    16: ipsum
17: ipsum     18: ipsum    19: ipsum    20: ipsum
21: ipsum   22: ipsum    23: ipsum   24: ipsum
- 🔂 Repeat the new wallet process to create an additional wallet. However, name the second wallet, pledgewallet.
- List wallets within CNTools
cd "${CNODE_HOME}"/scripts
./cntools.sh -o
- Select Wallet > List
mainwallet
Type            : CLI
Address         : addr_test1q...
Payment Addr    : addr_test1vzv...

pledgewallet
Type            : CLI
Address         : addr_test1qr3...
Payment Addr    : addr_test1vr...
This will list each wallet receiving Address and Payment Address.
- Copy the receiving address for each wallet and request tAda from the Cardano Preview testnet faucet.
- The faucet will send 10,000 tAda and return a transaction hash for each request. This can be validated on a Preview block explorer.
- Verify wallet funds by launching CNTools in local mode
cd "${CNODE_HOME}"/scripts
./cntools.sh -n
- Select Wallet > List
mainwallet
Type            : CLI
Address         : addr_test1q...
Funds           : 10,000 ADA

pledgewallet
Type            : CLI
Address         : addr_test1q...
Funds           : 10,000 ADA
ℹ️ 500 tAda + fee for registration is required to register a stake pool. This 500 tAda is refundable when retiring a stake pool. There is no pledge limit. The faucet should have sent more than enough tAda.
Step 05 - Create and Host Pool Metadata (.json) File
A pool metadata file describes a pool’s unique name, description, ticker, and homepage. This file must be hosted publicly.
- Use the following script to generate a poolMetaData.json file and replace values with unique ones.
cat > poolMetaD
ata.json << EOF
{
"name": "YourPoolName",
"description": "Your pool description",
"ticker": "XXXX",
"homepage": "https://yourpoollink.com"
}
EOF
- Host the file publicly on a domain or other method such as Github. The public URL to the metadata file must be less than or equal to 64 characters. Try to avoid redirect links. For example: https://raw.githubusercontent.com/stevanlohja/p/refs/heads/main/p.json (61 characters)
Step 06 - Create and Register Pool with CNTools
- Launch CNTools in local mode:
cd "${CNODE_HOME}"/scripts
./cntools.sh -n
- Select Pool > New
- Insert Pool Name as described in the pool’s meta file:
Pool Name: RAVENPOOL

Pool: RAVENPOOL
ID (hex)    : 4d9d6b34f3...
ID (bech32) : pool1fkwkkd...

press any key to proceed ..
- Select Pool > List
RAVENPOOL
ID (hex)              : 4d9d6b34f30e20...
ID (bech32)           : pool1fkwkkd8np...
Registered            : NO
As shown above, the pool is not registered - yet.
- In CNTools select Pool > Register > Online and select the pool to be registered.
Selected value: [o] Online

Select pool to register|modify
  RAVENPOOL
  [Esc] Cancel
- Set Pledge to a minimum of 500 tAda, but under 10,000.
⚠️ The faucet only sends 10,000 tAda, not 50,000 as shown as the default pledge in CNTools. Set a pledge based on available tAda in the intended Pledge wallet.
Select pool to register|modify
Selected pool: RAVENPOOL

Pool Parameters
press enter to use default value

Pledge (in ADA, default: 50,000: 1000
- Pool Margin is the percentage of rewards taken by the stake pool operator after the fixed cost but before rewards are distributed pro‐rata. Set desired % or default.
Select pool to register|modify
Selected pool: RAVENPOOL

Pool Parameters
press enter to use default value

Pledge (in ADA, default: 50,000: 1000
Margin (in %, default: 7.5):
- Pool Cost is the estimated SPO’s cost of operation (in Ada). Though, tAda is valueless. Select default.
Selected value: [o] Online

Select pool to register|modify
Selected pool: RAVENPOOL

Pool Parameters
press enter to use default value

Pledge (in ADA, default: 50,000: 1000
Margin (in %, default: 7.5):
Cost (in ADA, minimum: 170, default: 170):

Pool Metadata

Enter Pool's JSON URL to host metadata file - URL length should be less than 64 chars (default: https://foo.bat/poolmeta.json):
- Insert the public URL to the pool’s metadata file. It must be less than 64 characters. Ensure metadata is correct.
Select pool to register|modify
Selected pool: RAVENPOOL

Pool Parameters
press enter to use default value

Pledge (in ADA, default: 50,000: 1000
Margin (in %, default: 7.5):
Cost (in ADA, minimum: 170, default: 170):

Pool Metadata

Enter Pool's JSON URL to host metadata file - URL length should be less than 64 chars (default: https://foo.bat/poolmeta.json): https://tinyurl.com/ez9me9db

{
  "name": "RAVENPOOL",
  "description": "I have learned the value of silence, and the power of the unseen.",
  "ticker": "RVNP",
  "homepage": "https://x.com/stevanlohja"
}

Metadata exists at URL.  Use existing data?
  [y] Yes
  [n] No
- Select to register IPv4/v6 address for pool’s relay node.
- Insert IP address of cn1 relay node instance and port that relay node is running on (default: 6000).
Pool Relay Registration
  [d] A or AAAA DNS record
  [i] IPv4/v6 address
  [s] SRV DNS record
  [Esc] Cancel

Pool Relay Registration
Selected value: [i] IPv4/v6 address
Enter relays's IPv4/v6 address: x.x.x.x
Enter relays's port: 6000
Add more relay entries?
Selected value: [n] No
- Select pledgewallet and follow the remaining prompts to register.
Select main owner/pledge wallet (normal CLI wallet)
  mainwallet (10,000 ADA)
  pledgewallet  (10,000 ADA)
- The pool is now successfully registered.
Pool RAVENPOOL successfully registered!
Owner #1      : pledgewallet
Reward Wallet : pledgewallet
Pledge        : 1,000 ADA
Margin        : 7.5 %
Cost          : 170 ADA

Uncomment and set value for POOL_NAME in ./env with 'RAVENPOOL'

INFO: Total balance in 1 owner/pledge wallet(s) are: 9,497.640486 ADA
Pay attention to the recommendation in the successful registration prompt above that reads, Uncomment and set value for POOL_NAME in ./env with 'RAVENPOOL'. This will be done in the next step when converting cn2 into an official block producer node.
Step 07 - Convert cn2 into a BP node
Access BP Node Instance
multipass shell cn2
- Stop services
sudo systemctl stop cnode.service
sudo systemctl stop cnode-submit-api.service
Connect BP Node (cn2) ONLY to Relay node (cn1)
- Open
$CNODE_HOME/files/topology.jsonin an editor. Replace the entire topology contents with the below example. However, include the correct IP address and port for cn1 relay node instance and save the file.
{
    "bootstrapPeers": [],
    "localRoots": [
        {
            "accessPoints": [
                {
                    "address": "x.x.x.x",
                    "port": 6000,
                    "description": "cn1 relay node"
                }
            ],
            "advertise": false,
            "trustable": true,
            "hotValency": 1
        }
    ],
    "publicRoots": [
        {
            "accessPoints": [],
            "advertise": false
        }
    ],
    "useLedgerAfterSlot": -1
}
Set POOL_NAME Environment Variable
Going against the recommendation of, “Uncomment and set value for POOL_NAME in ./env with 'RAVENPOOL”. This can be done in the systemd service file.
- Open
/etc/systemd/system/cnode.servicein an editor:
sudo vim /etc/systemd/system/cnode.service
- Amend the file to include the POOL_NAME environment variable with the unique
POOL_NAMEas the value, and save the file.-
Example:
Environment=POOL_NAME=RAVENPOOL -
What the file may look like:
-
[Unit]
Description=Cardano Node
Wants=network-online.target
After=network-online.target
StartLimitIntervalSec=600
StartLimitBurst=5

[Service]
Type=simple
Restart=on-failure
RestartSec=60
User=ubuntu
LimitNOFILE=1048576
WorkingDirectory=/opt/cardano/cnode/scripts
Environment=POOL_NAME=RAVENPOOL
ExecStart=/bin/bash -l -c "exec /opt/cardano/cnode/scripts/cnode.sh"
ExecStop=/bin/bash -l -c "exec /opt/cardano/cnode/scripts/cnode.sh -s"
KillSignal=SIGINT
SuccessExitStatus=143
SyslogIdentifier=cnode
TimeoutStopSec=60

[Install]
WantedBy=multi-user.target
- Restart the Cardano node service:
sudo systemctl daemon-reload
sudo systemctl restart cnode
- Monitor node in gLiveView:
cd "${CNODE_HOME}"/scripts
./gLiveView.sh
The gLiveView should now recognize that the Cardano node is a “core”, block producing node at the top of the gLiveView dashboard and is only peered to the single relay node.
> Cardano Node - (Core - Preview) : 10.1.3 [36871ba0] <
┌───────────────────────────────┬────────────┬─────────────────────────┐
│ Uptime: 00:00:35 │ Port: 6000 │ Koios gLiveView v1.30.4 │
│-------------------------------└────────────┴────────────────��─────────┤
│ Epoch 808 [18.0%], 19:40:22 remaining │
│ ▌▌▌▌▌▌▌▌▌▌▌▌▖▖▖▖▖▖▖▖▖▖▖▖▖▖▖▖▖▖▖▖▖▖▖▖▖▖▖▖▖▖▖▖▖▖▖▖▖▖▖▖▖▖▖▖▖▖▖▖▖▖▖▖▖▖▖▖ │
│ │
│ Block : 2857472 Tip (ref) : 69826778 Forks : 0 │
│ Slot : 69826719 Tip (diff) : 59 :| Total Tx : 0 │
│ Slot epoch : 15519 Density : 3.735 Pending Tx : 0/0K │
│- CONNECTIONS --------------------------------------------------------│
│ P2P : enabled Cold Peers : 0 Uni-Dir : 0 │
│ Incoming : 0 Warm Peers : 0 Bi-Dir : 1 │
│ Outgoing : 1 Hot Peers : 1 Duplex : 0 │
│- BLOCK PROPAGATION --------------------------------------------------│
│ Last Block : 0.00s Less than 1|3|5s [%] : 0.00 | 0.00 | 0.00 │
│- NODE RESOURCE USAGE ------------------------------------------------│
│ CPU (sys) : 2.14% Mem (RSS) : 1.2G Disk util : 79% │
├─ CORE ───────────────────────────────────────────────────────────────┤
│ KES current|remaining|exp : 538 | 62 | 2025-04-11 20:00 EDT │
│ OP Cert disk|chain : 0 | ? │
│- BLOCK PRODUCTION ---------------------------------------------------│
│ Leader : 0 Adopted : 0 Invalid : 0 │
└────────────────────────────────────────────────────────────
🥳 Congratulations on setting up a Cardano Stake Pool on the Preview testnet.
Step 08 - Server and secret hardening
Configure Firewall Rules for BP Instance (cn2)
- Access BP node instance and stop the node:
multipass shell cn2
sudo systemctl stop cnode
- Deny all incoming connections using UFW:
sudo ufw default deny incoming
- Allow traffic from the specific Relay node IP address (cn1) to the BP node’s port (default: 6000).
sudo ufw allow proto tcp from x.x.x.x to any port 6000
- Enable UFW and verify UFW status
sudo ufw enable
sudo ufw status
Output may look something like:
To                         Action      From
--                         ------      ----
6000/tcp                   ALLOW       x.x.x.x
- Restart node and verify syncing:
sudo systemctl restart cnode
cd $CNODE_HOME/scripts
./gLiveView.sh
Encrypt and Backup Secrets
By default, pool and wallet keys are unencrypted and located in $CNODE_HOME/priv/.
For example:
tree $CNODE_HOME/priv/
├── asset
├── pool
│ ├── RAVENPOOL
│ ├── cold.counter
│ ├── cold.skey
│ ├── cold.vkey
│ ├── hot.skey
│ ├── hot.vkey
│ ├── kes.start
│ ├── op.cert
│ ├── pool.cert
│ ├── pool.config
│ ├── pool.id
│ ├── pool.id-bech32
│ ├── poolmeta.json
│ ├── vrf.skey
│ └── vrf.vkey
└── wallet
├── mainwallet
│ ├── base.addr
│ ├── cc-cold.skey
│ ├── cc-cold.vkey
│ ├── cc-hot.skey
│ ├── cc-hot.vkey
│ ├── derivation.path
│ ├── drep.skey
│ ├── drep.vkey
│ ├── ms_drep.skey
│ ├── ms_drep.vkey
│ ├── ms_payment.cred
│ ├── ms_payment.skey
│ ├── ms_payment.vkey
│ ├── ms_stake.cred
│ ├── ms_stake.skey
│ ├── ms_stake.vkey
│ ├── payment.addr
│ ├── payment.cred
│ ├── payment.skey
│ ├── payment.vkey
│ ├── reward.addr
│ ├── stake.cred
│ ├── stake.skey
│ └── stake.vkey
└── pledgewallet
├── base.addr
├── cc-cold.skey
├── cc-cold.vkey
├── cc-hot.skey
├── cc-hot.vkey
├── delegation.cert
├── derivation.path
├── drep.skey
├── drep.vkey
├��── ms_drep.skey
├── ms_drep.vkey
├── ms_payment.cred
├── ms_payment.skey
├── ms_payment.vkey
├── ms_stake.cred
├── ms_stake.skey
├── ms_stake.vkey
├── payment.addr
├── payment.cred
├── payment.skey
├── payment.vkey
├── reward.addr
├── stake.cert
├── stake.cred
├── stake.skey
└── stake.vkey
⚠️ In the unfortunate event an unauthorized actor may access cn2, then they can access these secrets! Therefore, it’s important to encrypt these secrets.
- Open CNTools in offline mode:
cd $CNODE_HOME/script
./cntools.sh -o
- Select Wallet > Encrypt > Select a wallet to encrypt and provide a secure password.
Select wallet to encrypt
  mainwallet  (unprotected)
  pledgewallet (unprotected)
- 🔂 Repeat wallet encryption steps for each wallet.
- Select Pool > Encrypt to encrypt pool keys.
When encrypting, the prompt gives a tip on how to decrypt the wallet. Decrypting the wallet is required when attempting to make a transaction.
INFO: wallet files are now protected
Use 'WALLET >> DECRYPT' to unlock
Step 09 - Cardano specific keys for the Midnight block producer registration process
Cardano SPOs may register as Midnight validators. This process involves a few keys specific to the SPO such as;
- cold.skey
- payment.vkey
- payment.skey
If you were following along with this tutorial, these keys can be discovered on the BP node at $CNODE_HOME/priv/.